3 - Driver Control
Introduction
In this tutorial, we will be learning how to program the drivetrain to allow for controller joystick inputs.
The controller
The controller has 2 joysticks. A left one and a right one. Each joystick has 2 axes, an x axis and a y axis. We will be using these axes to control the drivetrain.
Tank Drive
Tank drive is a simple method of controlling the drivetrain. You give it the power for the left wheels and the power for the right wheels. In this example, we will use the left y axis and the right y axis.
pros::Controller controller(pros::E_CONTROLLER_MASTER);

void opcontrol() {
    // loop forever
    while (true) {
        // get left y and right y positions
        int leftY = controller.get_analog(pros::E_CONTROLLER_ANALOG_LEFT_Y);
        int rightY = controller.get_analog(pros::E_CONTROLLER_ANALOG_RIGHT_Y);

        // move the robot
        chassis.tank(leftY, rightY);

        // delay to save resources
        pros::delay(25);
    }
}
Arcade Drive
Arcade drive is the most popular form of controlling the robot. In arcade control, we give the robot a forwards/backwards speed and a turning speed. Below are 2 examples: single stick arcade and double stick arcade.
Single Stick Arcade
pros::Controller controller(pros::E_CONTROLLER_MASTER);

void opcontrol() {
    // loop forever
    while (true) {
        // get left y and right x positions
        int leftY = controller.get_analog(pros::E_CONTROLLER_ANALOG_LEFT_Y);
        int leftX = controller.get_analog(pros::E_CONTROLLER_ANALOG_LEFT_X);

        // move the robot
        chassis.arcade(leftY, leftX);

        // delay to save resources
        pros::delay(25);
    }
}
Double Stick Arcade
pros::Controller controller(pros::E_CONTROLLER_MASTER);

void opcontrol() {
    // loop forever
    while (true) {
        // get left y and right x positions
        int leftY = controller.get_analog(pros::E_CONTROLLER_ANALOG_LEFT_Y);
        int rightX = controller.get_analog(pros::E_CONTROLLER_ANALOG_RIGHT_X);

        // move the robot
        chassis.arcade(leftY, rightX);

        // delay to save resources
        pros::delay(25);
    }
}
Throttle/Steer priority
You can prioritize steering over turning, or vice versa. For example, you could fully prioritize steering so that the angular velocity of the robot is guaranteed to be the same for a given steering input, no matter the throttle input. With LemLib, you can prioritize steering over throttle by a set amount, from 0 to 1. 0.5 is the default, where steering and turning have the same priority. 0 fully prioritizes throttle, while 1 fully prioritizes steering. See the code block below:
pros::Controller controller(pros::E_CONTROLLER_MASTER);

void opcontrol() {
    // loop forever
    while (true) {
        // get left y and right x positions
        int leftY = controller.get_analog(pros::E_CONTROLLER_ANALOG_LEFT_Y);
        int leftX = controller.get_analog(pros::E_CONTROLLER_ANALOG_LEFT_X);

        // move the robot
        // prioritize steering slightly
        chassis.arcade(leftY, leftX, false, 0.75);

        // delay to save resources
        pros::delay(25);
    }
}
Curvature Drive
Curvature drive is a lesser-know, yet powerful, method. We give the robot a forwards/backwards speed, and the curvature of an arc. The greater the curvature, the more the robot turns. Its similar to arcade but performs better when turning. Below is an example of single stick and double stick curvature drive:
Single Stick Curvature
pros::Controller controller(pros::E_CONTROLLER_MASTER);

void opcontrol() {
    // loop forever
    while (true) {
        // get left y and right x positions
        int leftY = controller.get_analog(pros::E_CONTROLLER_ANALOG_LEFT_Y);
        int leftX = controller.get_analog(pros::E_CONTROLLER_ANALOG_LEFT_X);

        // move the robot
        chassis.curvature(leftY, leftX);

        // delay to save resources
        pros::delay(25);
    }
}
Double Stick Curvature
pros::Controller controller(pros::E_CONTROLLER_MASTER);

void opcontrol() {
    // loop forever
    while (true) {
        // get left y and right x positions
        int leftY = controller.get_analog(pros::E_CONTROLLER_ANALOG_LEFT_Y);
        int rightX = controller.get_analog(pros::E_CONTROLLER_ANALOG_RIGHT_X);

        // move the robot
        chassis.curvature(leftY, rightX);

        // delay to save resources
        pros::delay(25);
    }
}
But which do I choose?
There is no right answer to this question. The driver should use whichever control method they feel most comfortable with.
Input Scaling
See also
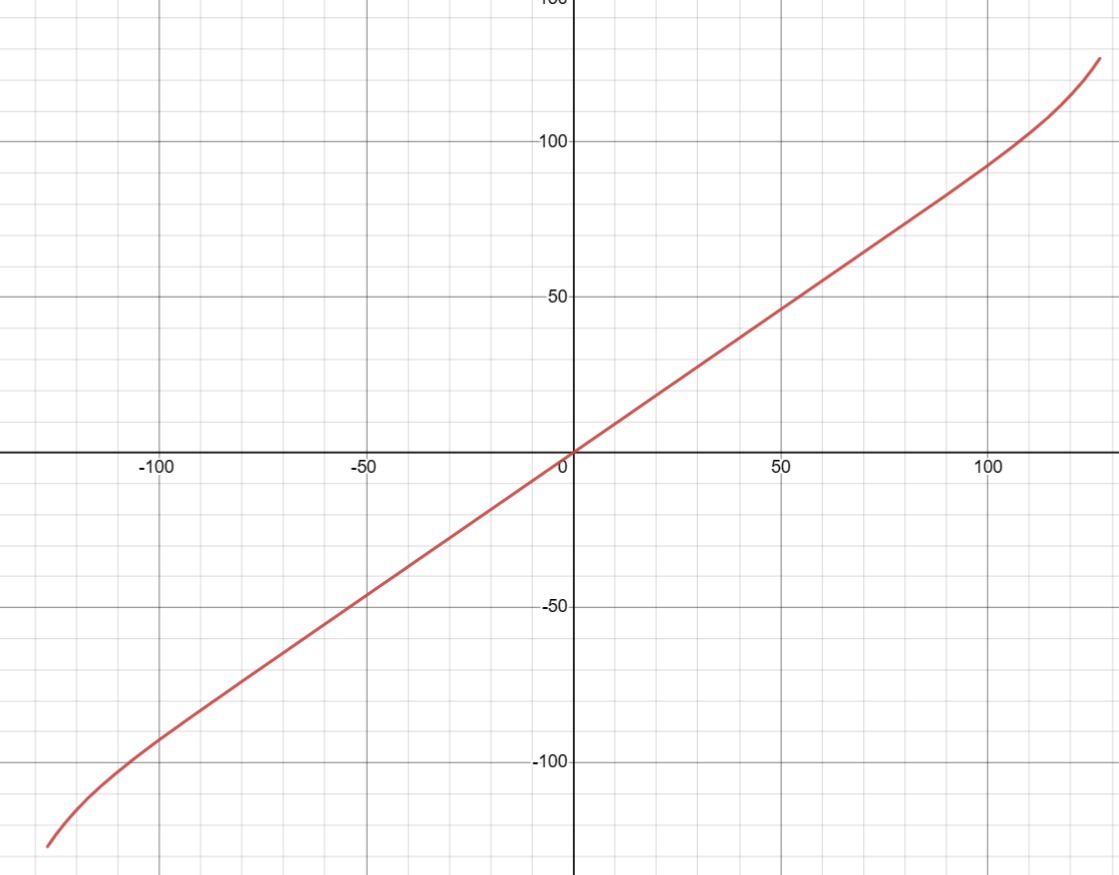
Making precise movements is difficult. If only there was a way make it less sensitive, but not limit the maximum speed. Well, there is a way, and it’s called input scaling.
Instead of the regular linear relationship between controller input and drivetrain output, input scaling is an exponential relationship to make small movements less sensitive in exchange for making fast movements more sensitive. Below in an image of this relationship:
Code
// input curve for throttle input during driver control
lemlib::ExpoDriveCurve throttle_curve(3, // joystick deadband out of 127
                                     10, // minimum output where drivetrain will move out of 127
                                     1.019 // expo curve gain
);

// input curve for steer input during driver control
lemlib::ExpoDriveCurve steer_curve(3, // joystick deadband out of 127
                                  10, // minimum output where drivetrain will move out of 127
                                  1.019 // expo curve gain
);

// create the chassis
lemlib::Chassis chassis(drivetrain,
                        lateral_controller,
                        angular_controller,
                        sensors,
                        &throttle_curve,
                        &steer_curve
);
Conclusion
That’s all for driver control. We will be covering autonomous motion and tuning in the next tutorial.